Notice:
This post is older than 5 years – the content might be outdated.
In this mini-series of blog articles we want to shed some light on the internals of the Android Graphics Pipeline. Google itself already released some insights and documentation on the subject such as the beautiful Google I/O 2012 talk For Butter or Worse by Chet Haase and Romain Guy (go watch it if you haven’t!) or the article Graphics architecture. While they certainly help to get the big picture involved in getting a simple view displayed on the screen, they are not that helpful when trying to understand the source code behind it. This series will give you a gentle jump start into the interesting world of the Android Graphics Pipeline.
Beware, a lot of source code and sequence diagrams will be involved in this mini-series! Its worth a read though, especially if you have even the slightest interest in the Android Graphics Pipeline, as you are going to learn a lot (or at least get to look at some pretty pictures). So get yourself a coffee and read on!
Introduction
In order to fully understand the journey all views undertake on the way to the screen, we will use a small demo app and describe every major stage in the Android Graphics Pipeline, starting with the public Android Java API (SDK), going to native C++ code and finally looking at the raw OpenGL drawing operations.

The activity consists of a simple RelativeLayout, an ActionBar with the application icon and title and a simple Button which reads Hello world!.

Inside the Android view hierarchy, the relative layout consists of a simple color-gradient background. More complex, the action bar is composed of the background, which is a gradient combined with a bitmap, the One Button text element and the application icon, which is also a bitmap. A 9-Patch is used as the background for the button, and the text element Hello World! is drawn on top of it. The navigation bar and status bar at the top and bottom of the screen are not part of the apps activity, they will be rendered by the SystemUI system service instead.
The Big Picture: Pipeline Overview
Having watched the Google I/O talk For Butter or Worse, you will certainly recognize the following slide, which shows the complete Android Graphics Pipeline.

The Surface Flinger is responsible for creating a graphics buffer and compositing it onto the main display and while certainly very important for the Android system, is not covered at this time.
Instead, we will look at a fine selection of components which are doing most of the heavy lifting in bringing the view to the screen:

Display Lists
As you may already know, Android uses a concept called DisplayLists to render all its views. For those of you who don’t know, a display list is a sequence of graphics commands needed to be executed to render a specific view. These display lists are an important element to achieve the high performance of the Android Graphics Pipeline.

Every view of the view hierarchy has a corrsponding display list, which is generated by the views onDraw() method, which every developer knows about. In order to draw the view hierarchy onto the screen, only the display lists need to be evaluated and executed. In case a single view gets invalidated (due to user input, animations or transitions), the affected display lists will be rebuilt and eventually redrawn. This is preventing Android from calling the quite expensive onDraw() methods every frame.
Display lists can also be nested, meaning that a display list can issue a command to draw a childrens display list. This is important in order to be able to reproduce view hierarchies with display lists. After all, even our simple app has multiple nested views.
These commands are a mixture of statements that can be directly mapped to OpenGL commands, such as translating and setting up clipping rectangles, and more complex commands such as DrawText and DrawPatch. These need a more complex set of OpenGL commands.
|
1 2 3 4 5 6 7 8 9 10 11 12 13 14 15 |
Save 3 DrawPatch Save 3 ClipRect 20.00, 4.00, 99.00, 44.00, 1 Translate 20.00, 12.00 DrawText 9, 18, 9, 0.00, 19.00, 0x17e898 Restore RestoreToCount 0 |
In the example above, you can clearly see what kind of operations are present in a display list for our simple button. The first operation is to save the current translation matrix to the stack, so that it can be later restored. It then proceeds to draw the buttons 9-Patch, followed by another save command. This is necessary because for the text to be drawn, a clipping rectangle is set up to only affect the region that where text will be drawn. Mobile GPUs can take this rectangle as an hint to further optimize the draw calls in later stages. The drawing origin is than translated to the text position and the text is drawn. At the end, the original translation matrix and state is restored from the stack, which also resets the clipping rectangle.
The complete log of the display lists for our example application can be seen at the bottom of this post.
Diving into code
With this newly accuired knowledge we are ready to dive into the code.
Root View
Every Android activity has an implicit root view at the top of the view hierarchy, containing exactly one child view. This child is the first real view of the application defined by the application developer. The root view is responsible for scheduling and executing multiple operations such as drawing and invalidating views, among other.
Similarly, every view has a reference to its parent. The first view inside the view hierarchy, which the root view references, has this root view as a parent. While serving as a base class for every visible element and widget, the View class does not support any children. However, the derrived ViewGroup supports multiple children and serves as a container base class, which is used by the standard layouts ( RelativeLayout etc.).
If a view is (partially) invalidated, the view will call the root views invalidateChildInParent() method. The root view keeps track of all invalidated areas and schedules a new traversal at the choreographer, which is performed on the next VSync event.

|
1 2 3 4 5 6 7 8 9 10 11 12 13 14 15 16 17 18 19 |
public ViewParent invalidateChildInParent(int[] location, Rect dirty) { // Add the new dirty rect to the current one mDirty.union(dirty.left, dirty.top, dirty.right, dirty.bottom); // Already scheduled? if (!mWillDrawSoon) { scheduleTraversals(); } return null; } |
Creating the Display Lists
As previously mentioned, each view is responsible to generate its own display list. When a VSync event is fired and the choreographer called performTraversals on the root view, the HardwareRenderer is asked to draw the view, which in turn will ask the view to generate its display list.

With currently almost 20.000 lines of code, the View is one of the bigger classes inside the Android framework. This comes as no surprise, as it is the building block for every widget and application. It handles the keyboard, trackball and touch events, as well as scrolling, scrollbars, layouting and measuring, and much, much more.

Called by the Hardware Renderer, the View.getDisplayList(…) method will create a new internal display list, which will be used for rest of the views lifetime. The internal display list is then asked to supply a canvas big enough to accommodate the view. Supplying a GLES20RecordingCanvas, the view and all its children will use it to draw upon, and is therefore handed to the draw(…) method. The canvas is somewhat special, as it will not execute drawing commands but rather save them as commands inside the display list. This means that the widgets and every view can use the normal drawing API without even noticing that the commands are rendered to a display list.
|
1 2 3 4 5 6 7 8 9 10 11 12 13 14 15 16 17 18 19 |
private DisplayList getDisplayList(DisplayList displayList, boolean isLayer) { HardwareCanvas canvas = displayList.start(width, height); if (!isLayer && layerType != LAYER_TYPE_NONE) { // Layers don't get drawn via a display list } else { draw(canvas); } return displayList; } |
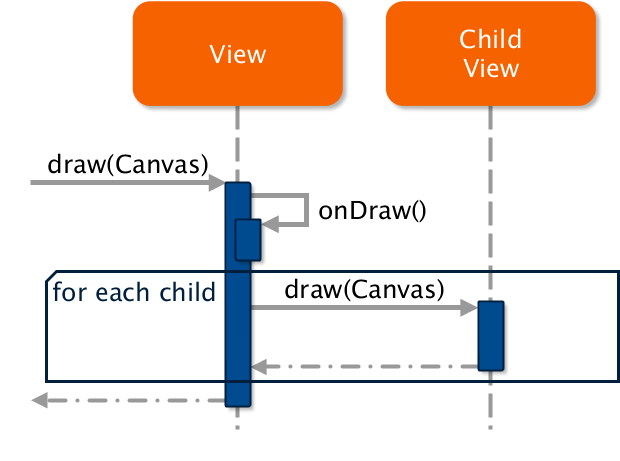
Inside the draw(…) method, the view will execute the onDraw() code, rendering itself onto the supplied canvas. If the view has any children, it will also call the draw() method of each of them. These children could be anything, from a normal button to another layout or view group, which itself includes another set of children, which will also get drawn.
Read on
With the generation of the display list this first part comes to an end. Jump to part 2 where we will actually take a look at how these display lists get rendered to the screen!
Download
The full Bachelor’s Thesis on which this article is based is available for download.
Get in touch
Interested in Android Development, Mobile and Embedded Systems? Have a look at our full portfolio on our website, drop us an email or call +49 721 619 021-0.
This is a very nice article thank you. I just have a question related to the DisplayLists. How did you manage to get the DisplayList of your view? Is it using a custom tool? Or by accessing it during runtime? I would like to capture the DisplayLists of my application while it’s running (ideally without the need to redraw my views to avoid overloading the UI Thread).