Polymer - TodoMVC Codelab
Eric Bidelman - updated 2013-08-28
This doc: http://goo.gl/lwrKK, intro preso: http://goo.gl/uwDOW
Step 0: Get the code / run the app
Download Polymer & TodoMVC dependencies
Step 1: Design an app structure with base elements
Step 2: Import & use the elements
Step 3: Data binding to a model
Hooking up the <td-model> data component
Step 4: Marking items as completed & removing
Conditional & dynamic attribute values
Step 5: Edit item functionality
Introduction
Welcome to Polymer! Polymer is a new type of library for the web, targeting the modern web platform, and useful for building web applications based on Web Components.
Unlike some other frameworks before it, Polymer attempts to embrace HTML as much as possible by encouraging the use of custom element wherever possible. It includes a handful of independent polyfills for these emerging web standards (Custom Elements, Shadow DOM, etc.) that over time, diminish and ultimately disappear as browser vendors implement the native APIs. Thus, it's designed to leverage the evolving web platform and get better over time!
Understanding the pieces
The entirety of Polymer consists of a several layers, each of which can be used a la carte.
Use as much, or as little of this stack as you'd like. Most people will use core (polymer.js) and above, but it's very much salt to taste.
Foundation
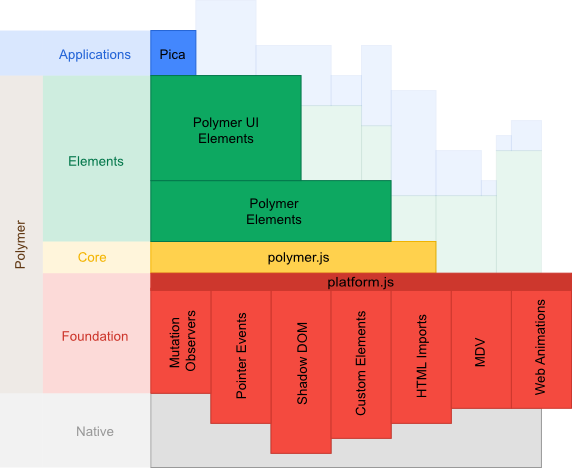
Consists of a set of polyfill libraries that enable the Web Component standards (Shadow DOM, <template>, HTML Imports, Custom Elements) to be usable, today.
Core
By themselves, Custom Element + Shadow DOM give you the primitives to build encapsulated components. These tools are marvelous by themselves, but it's handy to have additional sugaring to make app development even easier. For example, we can remove boilerplate code and provide features like two-way data-binding on top of the foundation. polymer.js provides this core layer as our opinionated way of using the Web Components standar, together. Think of it as the special sauce that you can use to create super-charged custom elements. Will talk more about the feature it provides later.
Elements
Elements is a work in progress. Eventually, we plan to have a standard set of sexy UI elements that are highly reusable and feel super great.
Applications
Applications is the last piece of the pie. The part that you build. Applications are full-fledged web apps, built using a collection of Polymer elements.
Before you begin
In this codelab, you'll build the standard TodoMVC application using Web Components, supercharged by Polymer.
Note: The Polymer version of TodoMVC has a few key differences from other framework implementations:
- Since Web Components allow you to create new types of DOM elements, the DOM tree is very different from other implementations.
- The template, styling, and behavior are fully encapsulated in each custom element. Instead of having an overall stylesheet (base.css/app.css), each element that needs styling has its own stylesheet.
- Non-visual elements such as the router and model are implemented as custom elements and appear in the DOM.
What you will learn:
- Create a custom element in the browser
- Published properties - create a public API for the element
- Declarative event-mapping
- Two-way databinding - sync a data model to UI
- Conditional & dynamic attributes
- Make the app work offline
Prerequisites
This code lab assumes that you are familiar with web programming (HTML, CSS, JS). Knowing the basics of Web Components is also helpful, though not required. If you want to learn the underlying concepts, see Web Components Explained.
Optional Resources
- API reference: polymer-project.org/polymer.html
- Getting Started
- html5rocks articles #webcomponents, Web Components Explained
- Polymer element template: http://jsfiddle.net/ebidel/mLT5G/3/
Step 0: Get the code / run the app
First things first. Let's get your environment setup and make sure you can run the final product.
Download the app code
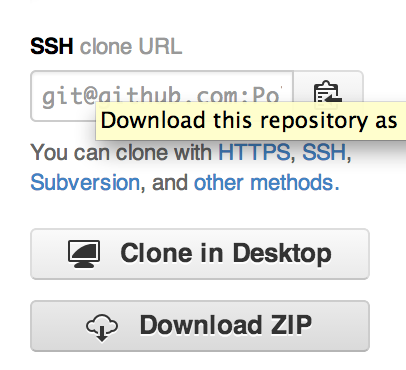
Either git clone the todomvc repo or download the code it as .zip.
To clone the repo from the command line:
git clone https://github.com/Polymer/todomvc
To get the source as a zip:
- Go to https://github.com/Polymer/todomvc
- Click the Download ZIP button in the right column.
Download Polymer & TodoMVC dependencies
Next, we'll get you a local copy of Polymer using a frontend package management tool called Bower. If you have Node already installed, skip to step 2.
- Install node.js (required for bower client-side package management)
- Install bower: npm install -g bower (you may need sudo)
- From the /todomvc folder, run bower update
Check out the codelab repo
The codelab walkthrough is in a separate repo. In the /todomvc folder, clone it as “codelab”:
git clone https://github.com/ebidel/polymer-todomvc-codelab codelab
Start a web server
To run the app, you need to start a web server in /todomvc directory. There are a couple of ways to do this.
- If you have Python installed, the easiest way is to run this command:
python -m SimpleHTTPServer
This starts a web server on 8000 (default).
- Use Google App Engine. A app.yaml has been provided for you. Simply start the dev server in the /todomvc app directory.
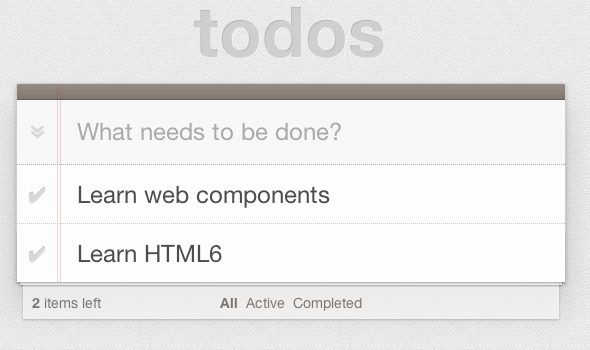
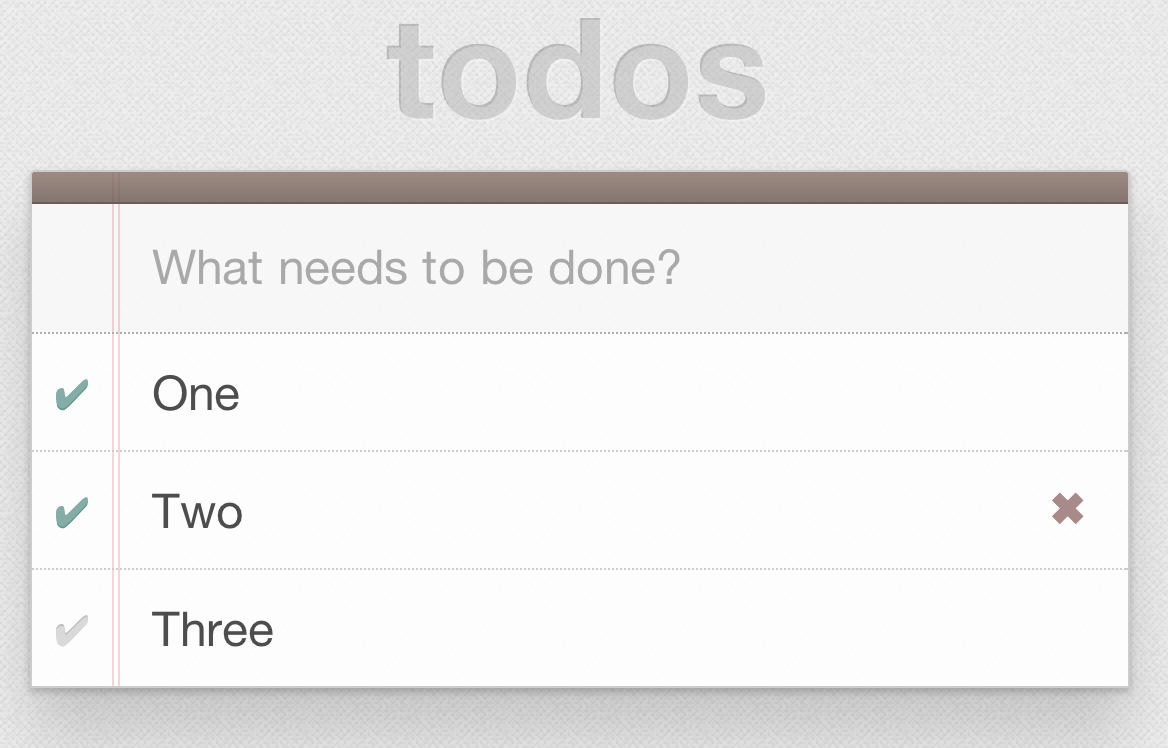
Once you've started a server, open http://localhost:8000/codelab in the browser. The final TodoMVC app is at http://localhost:8000/codelab/final/ and should look something like this:
Boom! Now that you're able to run the final product, let's work through creating it from scratch.
TIP: Using devtools to debug
In the DevTools, turn on "Show Shadow DOM" under the Settings wrench to be able to inspect and drill down into Shadow DOM.
Step 1: Design an app structure with base elements
When you start building an app using Polymer, it's important to think about how the app can be architected in a declarative way. That is to say, everything can be a web component that serves a specific purpose. Each component contains its own encapsulated functionality, styling, and markup.
We can build TodoMVC by creating several custom elements:
- <td-model> (provided) - encapsulates the data model
- <td-item> - represents a single todo item
- <td-todos> - dynamically renders the list of <td-item> as they change.
Define <td-item>
We'll create a custom element <td-item> to represent an individual todo item. It's responsible for its own markup, styling, and JavaScript to handle rendering itself.
In the codelab/step1/elements folder, open td-item.html and add the skeleton HTML for its element definition. The element styles have been provided for you in td-item.css.
<polymer-element name="td-item" extends="li">
<link rel="stylesheet" href="td-item.css">
<template>
<div class="view">
<input type="checkbox" class="toggle">
<label></label>
<button class="destroy"></button>
</div>
</template>
<script>
Polymer(‘td-item’, {
ready: function() {
}
});
</script>
</polymer-element>
We're creating a new HTML tag named "td-item"! When creating a custom element, the "name" attribute can be anything you'd like, but must contain at least one "-" separator.
Semantically, it makes sense that a list of todo items act similar to HTML’s native <li> element. Hence why <td-item> uses the "extends" attribute to extend itself from <li>.
Lastly, the call to Polymer(‘td-item’) tells Polymer to register this new tag in the browser. All Polymer elements will need this call.
Define <td-todos>
This element is responsible for rendering the list of items (e.g. <td-item>).
In the codelab/step1/elements folder, open td-todos.html and paste in the following:
<polymer-element name="td-todos">
<link rel="stylesheet" href="td-todos.css">
<template>
<section id="todoapp">
<header id="header">
<input id="new-todo" placeholder="What needs to be done?" autofocus>
</header>
<section id="main">
<ul id="todo-list">
<li is="td-item"></li>
</ul>
</section>
</section>
</template>
<script>
Polymer(‘td-todos’, {
});
</script>
</polymer-element>
The element declares <li> that "is" our specialized <td-item>. Right now this markup is hard coded as one item. Later on, we'll make it dynamically render a list of <li is="td-item"> based on the data.
At this point our app doesn’t do anything because we've merely defined the necessary elements. Let's import and use them!
Step 2: Import & use the elements
The basic definitions for our new elements are defined. Next, we need to include the definitions in the files that use the tags. This is done through HTML Imports.
HTML Imports are essentially a way to include HTML documents in other HTML documents. Like stylesheets, they use the <link> tag, but with rel="import":
<link rel="import" href="path/to/file.html">
Import the definitions
- At the top of codelab/step2/elements/td-todos.html, add an import to td-item.html.
- Add an import for elements/td-todos.html in the main app codelab/step2/index.html. It can live in the <head> or before the <body> close.
- Declare the <td-todos> tag in the body of codelab/step2/index.html
Navigate to http://localhost:8000/codelab/step2/ and admire your fine work or compare it to the solution at http://localhost:8000/codelab/step2_soln/. You should see the basic markup coming together.
Step 3: Data binding to a model
Introduction
Traditional MVC frameworks define a data model in JavaScript. In the Polymer world, let's embrace the "everything is an element" mantra and create an element <td-model> that encapsulates a model. One benefit of this approach is that the underlying data managing our todo list can be logically separated from elements that want to render it (e.g. <td-todos>). Exposing an .items property on <td-model> brings the power of two-way data binding to the scene. It automatically updates the DOM when data changes are made.
Using <td-model>
To save time, codelab/step3/elements/td-model.html is provided for you. You’ll simply declare it and consume it's public APIs / properties. This illustrates the composability and flexibility of web components. Someone else wrote the element. We're just going to use it to store our data!
The <td-model> definition is in td-model.html. You'll notice it doesn't have a <template>. It's a UI-less custom element that defines methods and properties (newItem, clearItems, filterItems) for working with the data it manages. In this case, the data it manages is an array named "items". The element defines public methods that push/pop onto this array when the list of todos needs changing:
<polymer-element name="td-model" attributes="filter items storageId">
<script>
Polymer(‘td-model’, {
...
ready: function() {
this.asyncMethod(function() {
this.items = this.items || [];
});
},
newItem: function(title) {
title = String(title).trim();
if (title) {
var item = {
title: title,
completed: false
};
this.items.push(item);
this.itemsChanged();
}
},
...
});
</script>
</polymer-element>
Note: properties and methods given to the second argument of Polymer() define the element's prototype. They're available to all instances of <td-model>.
Data binding to .items
<td-model> uses Polymer's "attributes" attribute to publish three properties: "filter", "items", and “storageId”:
<polymer-element name="td-model" attributes="filter items storageId">
The magical thing about published properties is that they're also two-way data bound. Anywhere in a Polymer element, you can say "bind data here" by using double mustache {{}}. When <td-model> internally updates its todos, any external elements that has set up bindings to items will also see those changes. For example, one can use templates to repeat over the list:
<template repeat="{{model.items}}">
<li is="td-item" item="{{}}"></li>
</template>
The DOM automagically stamps out a <td-item> for each item in “items". Note: the empty {{}} references the current iteration’s value. Alternatively, you can refer to it by name:
<template repeat="{{item in items}}">
<li is="td-item" item="{{item}}"></li>
</template>
Hooking up the <td-model> data component
In codelab/step3/index.html make the following updates:
- Use an HTML import to import td-model.html
- Declare <td-model> above <td-todos>.
- Connect <td-model> to <td-todos>:
- give <td-model> an id.
- add a modelId attribute on <td-todos>. Set it to the id of <td-model>.
In codelab/step3/elements/td-todos.html make the following updates:
- Use an HTML import to import td-input.html. This element is provided to you and enables keyboard handling.
- Publish a property, "modelId" in the attributes attribute of the <polymer-element>. When modeId is set in index.html, the modelIdChanged changed watcher is called. The method finds the element in the DOM and saves it to as a “model” property:
this.model = document.querySelector('#' + this.modelId);
- Create a <template> that repeats over model.items and stamps out a list of <li is="td-item">.
- On each <li is="td-item">, bind an “items” attribute to the iteration’s item. You can use “{{}}” to refer to the current iteration’s item.
- Update the declaration of <input id="new-todo"> so it "is" a <td-input>.
- Add a Polymer on-* declarative event mapping on <input id="new-todo"> that calls the element's addTodoAction() method on td-input-commit and another that calls cancelAddTodoAction() on td-input-cancel.
- Fill in addTodoAction().
In codelab/step3/elements/td-item.html:
- Use attributes=”” to publish a property named "item" on the element definiton.
- Bind the inner text of <label> to the item.title.
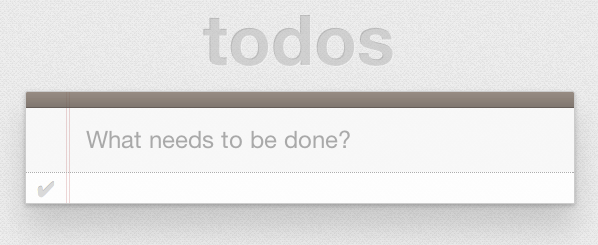
With these changes, you should be able to open http://localhost:8000/codelab/step3/, enter a todo, press ENTER, and see the list update. If you're stuck, refer to /step3_soln.
On to marking items as completed.
Step 4: Marking items as completed & removing
So far, we can add todos but can't mark them as complete or delete them. Let's hook up the ✔ and ✖ to do just that!
Conditional & dynamic attribute values
Polymer's binding engine supports more than binding properties in templates. It can also be used to conditionally set attributes or dynamically set attribute based on the result of an expression. See the supported Expressions syntax.
Example: apply the CSS class "completed" if the value of item.completed == true:
<div class="view {{completed: item.completed}}">
<!-- when item.completed == true -> class="view completed" -->
Example: check a checkbox if the value of item.completed == true:
<input type="checkbox" checked="{{item.completed}}">
Example: add the hidden attribute if the items is empty:
<div hidden?="{{items.length == 0}}">
In codelab/step4/elements/td-item.html, make the following updates:
- Use an expression to modify <div class="view completed">. Only apply "completed" when the item is complete.
- Check the toggle checkbox when the item is complete.
In codelab/step4/elements/td-todos.html, make the following updates:
- Hide <section id="main"> and <footer id="footer"> when there are no items. Do this by conditionally applying the hidden attribute.
- Hide <button id="clear-completed"> when there are 0 completed items. Use (model.completedCount) to form the expression.
- Hook up the <input id="toggle-all” type=”checkbox”>:
- Add an on-change handler that calls toggleAllCompletedAction().
- Check this checkbox when all items are complete. Use model.allCompleted to form the expression.
- Fill in the itemChangedAction() and clearCompletedAction() methods to call the appropriate methods in <td-model>.
Firing custom events
Polymer elements can fire a custom event to signal something has happened inside of them. They're also a great way to "message" between elements.
Polymer element have a handy fire() method for sending custom events. For example, to fire an event named 'my-event', one would call:
this.fire('my-event'); // fire(inType, inDetail, inToNode)
Events sent with fire() bubble by default, meaning parent elements can listen for the event by using on-* handlers:
<polymer-element name="td-item" on-click="onClick">
<script>
Polymer(‘td-item’, {
onClick: function() {
this.fire('td-item-changed');
}
});
</script>
</element>
<div class="view" on-td-item-changed="itemChangedAction">
<td-item></td-item>
</div>
In this example, <td-item> fires the 'td-item-changed' when it is clicked. The event bubbles up to the parent <div>, which in turn, invokes itemChangedAction().
In codelab/step4/elements/td-item.html, make the following updates:
- Add an on-click handler to the checkbox that calls itemChangeAction(). This method should fire the "td-item-changed" event.
- Add an on-click handler to <button class="destroy"> that calls destroyAction().
At this point, you should be able to open http://localhost:8000/codelab/step4/, enter a todos, mark them as completed with ✔, and remove them with ✖. If you're stuck, refer to the solution in /step4_soln.

Step 5: Edit item functionality
Adding and removing items is working like a charm...but users make mistakes. Let's let them edit an existing todo.
Only a few small changes are required to support editing. Since we architectured our app in such a way that everything is a self-contained web component, the changes only need to be made inside of <td-item>. This is because <td-item> encapsulates all the logic + presentation of rendering a single todo item. The rest of our app remains untouched!
In codelab/step5/elements/td-item.html, make the following updates:
- Using the attributes attribute, include another published property: "editing".
- Add a on-blur handler on the <polymer-element> that calls commitAction(). This saves the user's updates when they click outside of the editing input.
- Modify <div class="view {{completed: item.completed;}}">:
- Update the conditional expression for class so "editing" is also applied when the element's editing property is true: class="view {{completed: item.completed; editing: editing}}">
- Conditionally apply the hidden attribute if the editing property is true.
- Add a on-dblclick handler that calls editAction() to the element.
- At the bottom of the <template>, add an input for editing:
<input is="td-input" id="edit" class="edit"
value="{{title}}" hidden?="{{!editing}}"
on-td-input-commit="commitAction"
on-td-input-cancel="cancelAction">
This element is hidden when the editing property is false.
- Import td-input.html at the top of the file
Step 6: Taking it offline
The last step is to add persist storage to the user’s items so the items are restored when the page is refreshed. We can use HTML5 localStorage for this. In fact, <polymer-localstorage> is already implemented as a wrapper element around the localStorage API.
In codelab/step6/index.html, make the following updates:
- Use an HTML Import to import "../../lib-elements/polymer-localstorage.html”
- Declare <polymer-localstorage id="storage" name="todos-polymer"></polymer-localstorage> in the page.
- Set a storageId attribute on <td-model> with the id of <polymer-localstorage>.
Thanks to the reusability of web components, it only took three easy steps to take the application offline. Woohoo!
Conclusion
Hopefully you’ve seen how a simple, yet complete example like TodoMVC illustrates just how powerful Web Components and Polymer can be. Their declarative nature absolutely changes the way we think about building web applications, but it’s a welcomed change. HTML FTW!
Where to go from here?
Check out Polymer and start building your own elements!
- Download the latest version from polymer-project.org.
- Check out the list of Polymer elements.
Ideas for components to build:
- sortable data table
- <auto-complete> - tied to backend datastore
- <infinite-list> - scroll position to load more data
- <user-login> - username/password prompt (using a modal box) + validation (:invalid)
- <x-button> - with attributes for color
- <g-plusone> - G+ plus one button
- Element that has responsive design built in
- App that uses web animations
- App that works on mobile and uses pointer gestures
Complex components:
- Location module (maps api + title + single/multiple pins)
- Lightbox module (speed, auto-start, img links)
- Gmail type notification that disappears (or check standard: rich notifications)
- Breadcrumbs (hierarchy shown in menu bar)
- Pagination bar
- Progress bar (text, colour, option for texture) - check labs!
- Page layouts using Flexbox - (polymer-elements has an example)