Xamarin Forms with MVVM Light
Short introduction
Model – View – ViewModel (MVVM). I suppose that you heard something about it. This pattern created by Microsoft is widely used with applications created with .NET Framework but not only because you can also use it with Xamarin. Great! But why I should use MVVM, especially with mobile apps?
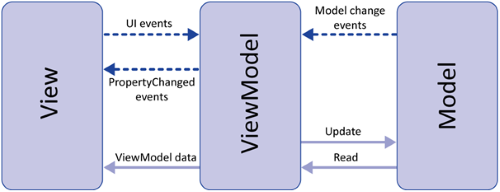
Answer is simple – this is cross-platform development. The biggest advance of this approach is to write code once and use it on three platforms – Windows, iOS and Android. With MVVM pattern you are able to create architecture where your business logic is separated from user interface. This enables you to write code once, test it and use on different devices. Look:
That’s why it is good practice to use MVVM when developing Xamarin Forms application.
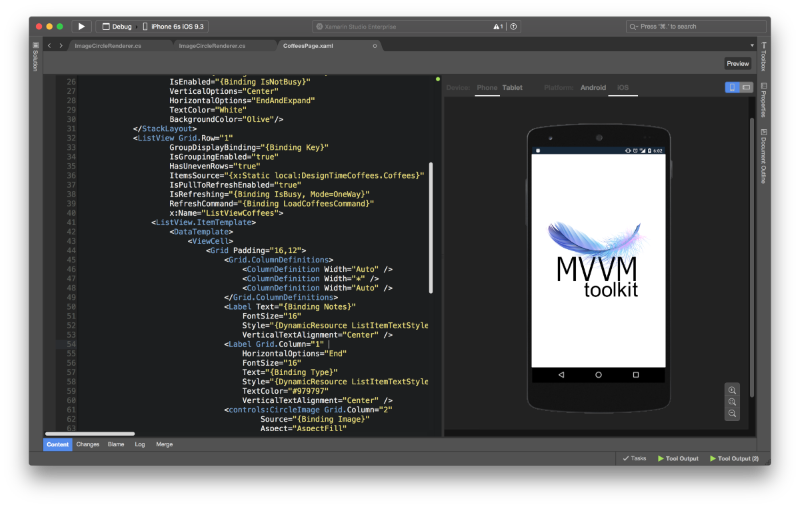
There are many different frameworks to help developers like: MVVM Cross, MVVM Fresh or MVVM Light about which I would like to write in this article and show how to use it. MVVM light is toolkit to accelerate the creation and development of MVVM applications in WPF, Silverlight, Windows Store, Windows Phone and Xamarin.
What do I need to start?
1) Visual Studio 2015 Community (for free or choose higher version) or Xamarin Studio
Let’s start
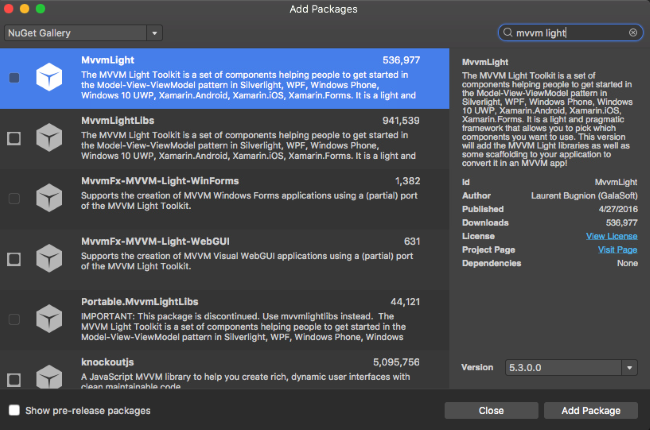
MVVM Light toolkit is available via NuGet so it is easy to include it in your app packages. Before we do it it is worth to say that there are two types of NuGets available:
- MVVM Light libraries only – lightweight framework which allows developers to choose which components they want to use. This version does not add any scaffolding to your application (like ViewModel Locator)
- MVVM Light – lightweight framework which allows developers to choose which components they want to use. The difference against “MVVM Light Libs only” is that this version will add the MVVM Light libraries as well as some scaffolding to your application to convert it in an MVVM application.
Of course if you choose MVVM Light version “libs” will also be included in the project.
Create new Xamarin Forms application project and add MVVM Light package
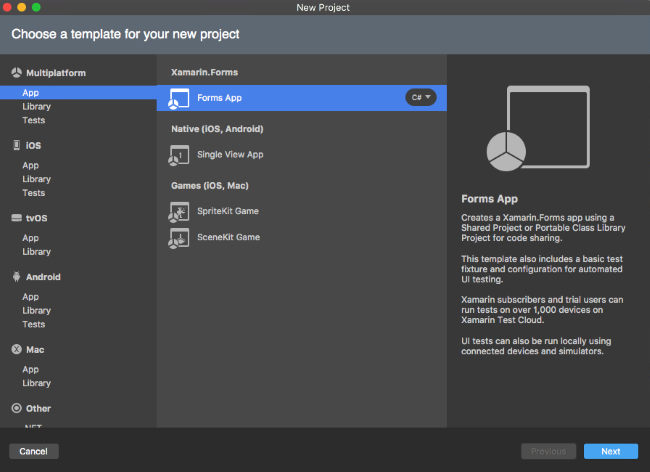
1) Create new blank Xamarin Forms XAML based application (PCL for sharing code) project:
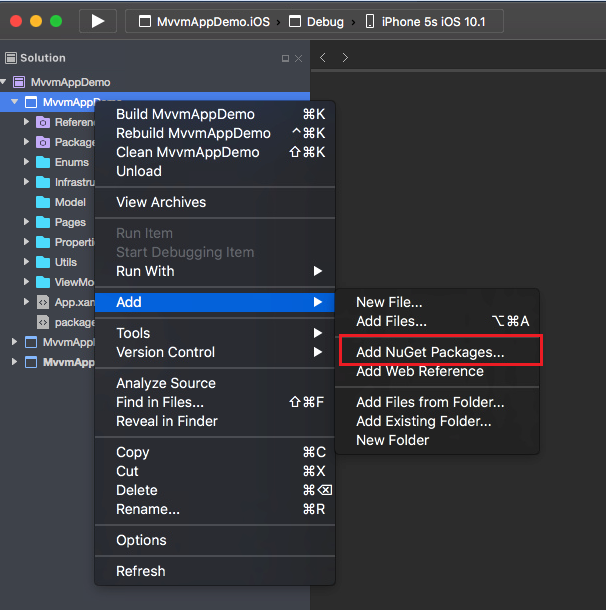
2) Add required MVVM Light NuGet packages. Please remember that you have to add it to all projects (Portable, iOS, Android and UWP):
3) Type “MVVM Light” in search window. As you can see there are two NuGets: MVVM Light and MVVM Light libs. We are interested in MVVM Light – it will also include libs but with additional scaffolding:
After NuGet was successfully added to each project, see references in Portable project. As you can see there are three packages referenced:
- Common Service Locator
- MVVM Light
- MVVM Light Libs
All above are required to implement MVVM pattern in our Xamarin Forms application. What is more we used MVVM Light package so there is scaffolding applied. Open “ViewModel” folder. As you can see “MainViewModel” and “ViewModelLocator” files were added automatically:
Done! Now you are ready to implement MVVM pattern with MVVM Light.
Create application architecture with MVVM Light
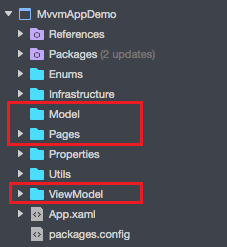
First of all it is good to divide Models, ViewModels and Views into folders. As you saw above MVVM Light created ViewModel folder automatically. Now add two more folders:
- Model – here we will keep classes with models for objects used in the application
- Pages – here we will keep pages (Views) in our Xamarin Forms application
All three folders should be visible in PCL project:
Pages (Views)
Let’s start from pages – create two pages with simple UI:
- MainPage
- DetailsPage
1) XAML code for “MainPage” should look like below:
<ContentPage    xmlns="http://xamarin.com/schemas/2014/forms"    xmlns:x="http://schemas.microsoft.com/winfx/2009/xaml"    xmlns:local="clr-namespace:MvvmAppDemo"    x:Class="MvvmAppDemo.MainPage"    Title = "Main page">
       <Button Text="Navigate" VerticalOptions="Center" HorizontalOptions="Center" Command = "{Binding NavigateCommand}"/>
</ContentPage>
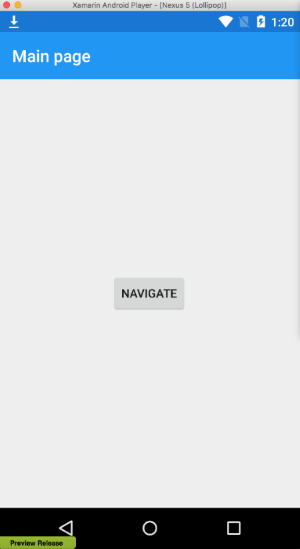
As you can see there is only one button – we will use it to navigate to “DetailsPage”.
Let’s look on below fragment:
Command = "{Binding NavigateCommand}"
This is mechanism called “binding”. Binding allows the flow of data between UI elements and data object on user interface with loose coupling between business logic and user interface.
We will see how it works later in this article.
2) “DetailsPage” page XAML code should look like below:
<ContentPage xmlns="http://xamarin.com/schemas/2014/forms" xmlns:x="http://schemas.microsoft.com/winfx/2009/xaml" x:Class="MvvmAppDemo.DetailsPage" Title ="Details page">
	<ContentPage.Content>
		<Grid>
			<Grid.RowDefinitions>
				<RowDefinition/>
				<RowDefinition/>
				<RowDefinition/>
				<RowDefinition/>
			</Grid.RowDefinitions>
			<Image Source = "{Binding MyImageSource}" Grid.Row="0" Margin="24"/>
			<ActivityIndicator IsRunning="{Binding ProgressVisible}" HorizontalOptions="Center" Grid.Row="1"/>
			<ScrollView Grid.Row= "2">
			<Label HorizontalOptions= "Center" Text="{Binding ImageDescription}" FontSize="11"/>
			</ScrollView>
			<Button AutomationId="TakePictureButton" Grid.Row ="3" Text="Take picture" Command="{Binding AddNewImage}" TextColor="#626d71"/>
		</Grid>
	</ContentPage.Content>
</ContentPage>
Binding is also used here (for controls like label or button).
When talking about binding it is very important to mention about “Binding context”. Each page has some controls and actions related with them. Some of them are clickable (like button) other need to display some data. That is why “Binding context” is needed. Binding context is source of data and actions for page controls. ViewModels are contexts for different pages.
Look at this example:
<Label HorizontalOptions= "Center" Text="{Binding ImageDescription}" FontSize="11"/>
Property “Text” for label is bound to “ImageDescription” property in ViewModel. So when something is changed in ViewModel and “ImageDescription” property is changed, “Text” property is automatically updated. You do not have to hard-code any text now. I will show how to provide “Binding context” for pages later in this article.
ViewModels
ViewModels are binding contexts for views (in our case – pages). To keep clear architecture in our project each Page has individual ViewModel. Let’s see how it looks in the code.
1) Open “MainViewModel” class. Replace existing code with below:
public class MainViewModel : ViewModelBase
	{
		private readonly INavigationService _navigationService;
		public ICommand NavigateCommand { get; private set; }


		public MainViewModel(INavigationService navigationService)
		{
			////if (IsInDesignMode)
			////{
			////    // Code runs in Blend --> create design time data.
			////}
			////else
			////{
			////    // Code runs "for real"
			////}
			///
			///
			_navigationService = navigationService;
			NavigateCommand = new Command(() => Navigate());
		}

		private void Navigate()
		{
			_navigationService.NavigateTo(AppPages.DetailsPage);
		}
	}
2) Add one more ViewModel called “MainViewModel” class. Replace existing code with below:
public class DetailsViewModel: ViewModelBase
	{
		private readonly INavigationService _navigationService;
		private ICognitiveClient _cognitiveClient;
                // Image source property to display selected image from gallery:
		ImageSource _myImafeSource;
		public ImageSource MyImageSource
		{
			get
			{
				if (_myImafeSource == null)
				{
					return Device.OnPlatform(
			iOS: ImageSource.FromFile("Images/picture.png"),
			Android: ImageSource.FromFile("picture.png"),
			WinPhone: ImageSource.FromFile("Images/wpicture.png"));
				}
				return _myImafeSource;
			}

			set
			{
				_myImafeSource = value;
				RaisePropertyChanged();
			}
		}
               // Image description property to display result from Cognitive Services:
		string _imageDescription;
		public string ImageDescription
		{
			get
			{
				return _imageDescription;
			}

			set
			{
				_imageDescription = value;
				RaisePropertyChanged();
			}
		}
               // Bool property to enable and disable progress bar when loading result:
		bool _progressVisible;
		public bool ProgressVisible
		{
			get
			{
				return _progressVisible;
			}

			set
			{
				_progressVisible = value;
				RaisePropertyChanged();
			}
		}

		public ICommand AddNewImage { get; private set; }


		public DetailsViewModel(INavigationService navigationService, ICognitiveClient cognitiveClient)
		{
			_navigationService = navigationService;
			_cognitiveClient = cognitiveClient;
			AddNewImage = new Command(async () => await OnAddNewImage());
		}
              // Add new image method where we are using CognitiveClient object and also "Person" class:
		private async Task OnAddNewImage()
		{
			ImageDescription = string.Empty;
			if (CrossMedia.Current.IsPickPhotoSupported)
			{
				var image = await CrossMedia.Current.PickPhotoAsync();
				if (image != null)
				{
					var stream = image.GetStream();
					MyImageSource = ImageSource.FromStream(() =>
					{
						return stream;
					});
					try
					{
						ProgressVisible = true;
						var result = await _cognitiveClient.GetImageDescription(image.GetStream());
						image.Dispose();

						Person person = new Person()
						{
							Name = "Bill",
							Surname = "Gates",
							Information = result.Description.Tags
						};

						foreach (string tag in person.Information)
						{
							ImageDescription = ImageDescription + "\n" + tag;
						}
					}
					catch (Microsoft.ProjectOxford.Vision.ClientException ex)
					{
						ImageDescription = ex.Message;
					}
					ProgressVisible = false;
				}
			}
		}
	}
Let’s start from top. As you can see there is one field “_navigationService” which is initialized in the constructor. With NavigationService object we are able to navigate in our application and pass parameters between pages.
You should also notice “IsInDesignMode” condition in the constructor. This is for Universal Windows Apps – you can provide data that will be displayed during creation of user interface in Blend.
Open “ViewModelLocator”. Replace existing code with below:
public class ViewModelLocator
    {
        ///


<summary>
        /// Initializes a new instance of the ViewModelLocator class.
        /// </summary>


        public ViewModelLocator()
        {
            ServiceLocator.SetLocatorProvider(() => SimpleIoc.Default);

			////if (ViewModelBase.IsInDesignModeStatic)
			////{
			////    // Create design time view services and models
			////    SimpleIoc.Default.Register<IDataService, DesignDataService>();
			////}
			////else
			////{
			////    // Create run time view services and models
			////    SimpleIoc.Default.Register<IDataService, DataService>();
			////}
			///
            SimpleIoc.Default.Register<MainViewModel>();
			SimpleIoc.Default.Register<DetailsViewModel>();
			SimpleIoc.Default.Register<ICognitiveClient, CognitiveClient>();
        }


        public MainViewModel MainViewModel
        {
            get
            {
                return ServiceLocator.Current.GetInstance<MainViewModel>();
            }
        }

		public DetailsViewModel DetailsViewModel
		{
			get
			{
				return ServiceLocator.Current.GetInstance<DetailsViewModel>();
			}
		}

        public static void Cleanup()
        {
            // TODO Clear the ViewModels
        }
    }
Let’s discuss what is happening here:
- Constructor – as you can see we can set design time data (explained) earlier. There is also below line:
ServiceLocator.SetLocatorProvider(() => SimpleIoc.Default);
It is used to configure default container where we will register dependencies:
SimpleIoc.Default.Register<MainViewModel>();
SimpleIoc.Default.Register<DetailsViewModel>();
SimpleIoc.Default.Register<ICognitiveClient, CognitiveClient>();
As you can see we register MainViewModel, DetailsViewModel and CognitiveClient. This enables developers to create loose coupling in the application. Do not worry about CognitiveClient – I will excplain it soon.
There are also two public properties: “MainViewModel” and “DetailsViewModel” which enables to localize ViewModels by Views (Pages) and set binding contexts. I will show how to do it later.
Models
For this sample purpose I we will create one simple class – “Person”. Create this class under “Models” folder:
public class Person
	{
		public string Name { get; set;}
		public string Surname { get; set;}
		public IEnumerable<string> Information { get; set;}

		public Person()
		{
		}

		public Person(string name, string surname, IEnumerable<string> information)
		{
			Name = name;
			Surname = surname;
			Information = information;
		}
	}
Handle navigation
Great, now you know how to apply MVVM pattern in your Xamarin Forms application. Still we have few things to add.
Navigation – we need to provide service to handle navigation between pages in proper way:
Create “Infrastructure” folder and “Services” folder inside it:
Add interface called “INavigationService”:
public interface INavigationService
	{
		void GoBack();
		void NavigateTo(AppPages pageKey);
		void NavigateTo(AppPages pageKey, object parameter);
	}
As you can see here are three methods:
- GoBack – this method is responsible for navigating back
- NavigateTo(AppPages pageKey) – this method is responsible for navigating between pages (without passing parameter)
- NavigateTo(AppPages pageKey, object parameter) – navigating between pages but including parameter to pass
Remember that MVVM Light navigation is based on the page-to-page navigation, not viewModel-to-ViewModel by default.
Now it is time to implement this interface. Add “NavigationService” class in the same folder. It should look like below:
public class NavigationService : INavigationService
	{
                // Dictionary with registered pages in the app:
		private readonly Dictionary<AppPages, Type> _pagesByKey = new Dictionary<AppPages, Type>();
                // Navigation page where MainPage is hosted:
		private NavigationPage _navigation;
                // Get currently displayed page:
		public string CurrentPageKey
		{
			get
			{
				lock (_pagesByKey)
				{
					if (_navigation.CurrentPage == null)
					{
						return null;
					}

					var pageType = _navigation.CurrentPage.GetType();

					return _pagesByKey.ContainsValue(pageType)
						              ? _pagesByKey.First(p => p.Value == pageType).Key.ToString(): null;
				}
			}
		}
                // GoBack implementation (just pop page from the navigation stack):
		public void GoBack()
		{
			_navigation.PopAsync();
		}
                // NavigateTo method to navigate between pages without passing parameter:
		public void NavigateTo(AppPages pageKey)
		{
			NavigateTo(pageKey, null);
		}
                // NavigateTo method to navigate between pages with passing parameter:
		public void NavigateTo(AppPages pageKey, object parameter)
		{
			lock (_pagesByKey)
			{

				if (_pagesByKey.ContainsKey(pageKey))
				{
					var type = _pagesByKey[pageKey];
					ConstructorInfo constructor;
					object[] parameters;

					if (parameter == null)
					{
						constructor = type.GetTypeInfo()
							.DeclaredConstructors
							.FirstOrDefault(c => !c.GetParameters().Any());

						parameters = new object[]
						{
						};
					}
					else
					{
						constructor = type.GetTypeInfo()
							.DeclaredConstructors
							.FirstOrDefault(
								c =>
								{
									var p = c.GetParameters();
									return p.Count() == 1
										   && p[0].ParameterType == parameter.GetType();
								});

						parameters = new[]
						{
						parameter
					};
					}

					if (constructor == null)
					{
						throw new InvalidOperationException(
							"No suitable constructor found for page " + pageKey);
					}

					var page = constructor.Invoke(parameters) as Page;
					_navigation.PushAsync(page);
				}
				else
				{
					throw new ArgumentException(
						string.Format(
							"No such page: {0}. Did you forget to call NavigationService.Configure?",
							pageKey), nameof(pageKey));
				}
			}
		}
                // Register pages and add them to the dictionary:
		public void Configure(AppPages pageKey, Type pageType)
		{
			lock (_pagesByKey)
			{
				if (_pagesByKey.ContainsKey(pageKey))
				{
					_pagesByKey[pageKey] = pageType;
				}
				else
				{
					_pagesByKey.Add(pageKey, pageType);
				}
			}
		}
                // Initialize first app page (navigation page):
		public void Initialize(NavigationPage navigation)
		{
			_navigation = navigation;
		}
	}
Navigation service handles navigation between pages. Remember also to add “Enums” folder and class inside it called “AppPages” to keep pages types used in NavigationService:
public enum AppPages { MainPage, DetailsPage }
Configure Microsoft Cognitive Services
CognitiveClient – we want to implement image analysis in our app using Microsoft Cognitive Services.
Create folder called “CognitiveServices” under “Infrastructure” folder:
Add interface called “ICognitiveClient”:
public interface ICognitiveClient
  {
     Task<AnalysisResult> GetImageDescription(Stream stream);
  }
As you can see there is only one method to implement:
- “GetImageDescription” – this method will be responsible for sending image stream to Microsoft Cognitive Services and receiving analysis result.
Now it is time to implement this interface. Add “CognitiveClient” class in the same folder. It should look like below:
public class CognitiveClient : ICognitiveClient
	{
		public async Task<AnalysisResult> GetImageDescription(Stream stream)
		{
			VisionServiceClient visionClient = new VisionServiceClient(Config.CognitiveClientApiKey);
			VisualFeature[] features = { VisualFeature.Tags, VisualFeature.Categories, VisualFeature.Description };
			return await visionClient.AnalyzeImageAsync(stream, features.ToList(), null);
		}
	}
Remember that before you can use Cognitive Services you need to register. You can find how to setup it in my previous article here.
Create folder called “Utils” and class called “Config” inside it. In this class you can store configuration keys (in this case Api key for Cognitive Services):
public class Config
  {
    public const string CognitiveClientApiKey = "<<YOUR API KEY HERE>>";
  }
Setup Application and Services
Now it is time to pin everything together. There are few steps:
1) Open “App.xaml.cs” file. It should look like belkow. I added comments to make it easier to understand what is happening:
	public partial class App : Application
	{
		//ViewModelLocator object to handle ViewModels and bindings between them and Views (Pages):
		private static ViewModelLocator _locator;
		public static ViewModelLocator Locator
		{
			get
			{
				return _locator ?? (_locator = new ViewModelLocator());
			}
		}

	  public App()
         {
            InitializeComponent();

            INavigationService navigationService;

            if (!SimpleIoc.Default.IsRegistered<INavigationService>())
            {
                // Setup navigation service:
                navigationService = new NavigationService();

                // Configure pages:
                navigationService.Configure(AppPages.MainPage, typeof(MainPage));
                navigationService.Configure(AppPages.DetailsPage, typeof(DetailsPage));

                // Register NavigationService in IoC container:
                SimpleIoc.Default.Register<INavigationService>(() => navigationService);
            }

            else
                navigationService = SimpleIoc.Default.GetInstance<INavigationService>();

            // Create new Navigation Page and set MainPage as its default page:
            var firstPage = new NavigationPage(new MainPage());
            // Set Navigation page as default page for Navigation Service:
            navigationService.Initialize(firstPage);
            // You have to also set MainPage property for the app:
            MainPage = firstPage;
         }


		protected override void OnStart()
		{
			// Handle when your app starts
		}

		protected override void OnSleep()
		{
			// Handle when your app sleeps
		}

		protected override void OnResume()
		{
			// Handle when your app resumes
		}
	}
2) Bind ViewModels with Pages (Views):
a. Open “MainPage.xaml.cs” file and add below line in the constructor just below “InitializeComponent” line:
BindingContext = App.Locator.MainViewModel;
b. Open “DetailsPage.xaml.cs” file and add below line in the constructor just below “InitializeComponent” line:
BindingContext = App.Locator.DetailsViewModel;
Above lines will bind selected ViewModel with selected Page (View). Now all actions performed via user interface will be handled by ViewModels.
Passing parameters
You can of course pass parameters using MVVM Light. I would like to show you two approaches:
- Passing parameters between ViewModels – with Messenger class provided by MVVM Light.
Messaging mechanism is popular when passing parameters between ViewModels. Xamarin Forms has it own class called “MessagingCenter” but in this example we will use “Messenger” class provided by MVVM Light.
Messaging mechanism is very simple – you can send message (parameter) from one ViewModel and register to receive it in the other ViewModel (to receive parameter). Let’s see how it works.
Open “MainViewModel” class and change Navigate method like below:
		private void Navigate()
		{
			var person = new Person() { Name = "Daniel" };
			Messenger.Default.Send(person);
			_navigationService.NavigateTo(AppPages.DetailsPage);
		}
As you can see we created new Person object and then we are sending it. Do not worry I will show you below how to receive sent parameter. Just notice that we are sending it with one line of code.
Now open “DetailsViewModel”. Here we need to add Person type property:
                Person _person;
		public Person Person
		{
			get
			{
				return _person;
			}

			set
			{
				_person = value;
				RaisePropertyChanged();
			}
		}
Now we need to register to receive passed parameter. Add below code to the constructor just before closing bracket:
Messenger.Default.Register<Person>(this, person => { Person = person; });
Last thing to do is to enable creating “DetailsViewModel” instance immediately in the “ViewModelLocator” to enable registration of parameters by Messenger in this class. To do it we need to just add “true” when registering ViewModel in Ioc container:
SimpleIoc.Default.Register<DetailsViewModel>(true);
As you can see we registered to receive parameters with type Person. Now we can get parameter and assign it to Person property.
That’s it!
- Passing parameters between Pages (Views) – with NavigationService class
MVVM Light is concentrated on the Page -Page navigation by default so I would like to show you how to handle passing parameters between Pages (Views).
Open “DetailsPage” and add Person parameter to the constructor like below:
    public DetailsPage(Person person)
		{
			InitializeComponent();
			BindingContext = App.Locator.DetailsViewModel;
			App.Locator.DetailsViewModel.Person = person;
		}
As you can see “DetailsPage” has one parameter in the constructor. We set “BindingContext” to “DetailsViewModel”. When navigating to this page we will pass parameter in the constructor. No worries below I will show how to do it. We can get parameter and assign it to Person propery in the ViewModel.
How to pass parameter with “NavigationService”? Open “MainViewModel” and change “Navigate” method like below:
private void Navigate()
		{
			var person = new Person() { Name = "Daniel" };
			_navigationService.NavigateTo(AppPages.DetailsPage, person);
		}
Simple! You just need to add parameter in the “NavigateTo” method just after Page type where you would like to navigate.
It is your choice which method you decide to choose.
Launch application and see result
Now it is time to test our application! Launch it on Android emulator and iOS simulator and check if it works properly:
Sum up
MVVM pattern and mobile applications – as you can see it is possible with MVVM Light and Xamarin Forms. Remember that with simple application you can think that applying MVVM is waste of time but it is not. In the future if you add more functionality (code) it is much easier to handle it. Please also note that unit testing is also much easier. I hope that this article help you to start. Whole sample application is available on my GitHub.





You must be logged in to post a comment.