

Introduction: Attiny85 5110LCD DS18B20 Thermometer


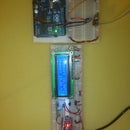
I was able to make a simple termometer with Attiny85 microcontroller.A small price, small dimensions, low power and low voltage.
Step 1: Parts:

For this project you need a some parts:
1: Attiny85 uC
2. Nokia 5110 LCD
3. DS18B20 + 4,7K ohm resistor
4. Breadbord + jumper wire
Step 2: NOTICE:
Is possible error for uploading code on Attiny85. I would recommend using the arduino 1.0.5 Ide ( i use 1.0.6) and it should work just fine.You need a tinyPCRELpatch. Extract from zip and copy file to C:\Program Files (x86)\Arduino\hardware. Then you should not have problems with upload. Also copy a libraries in C:\Users\(your user)\Documents\Arduino\libraries.
Step 3: Upload Code;
#include <OneWire.h>
#define ONEWIRE_BUSS 4
OneWire TemperatureSensor(ONEWIRE_BUSS);
#include
// SCK (CLK) ------- Attiny85 pin 5
// MOSI (DIN)------- Attiny85 pin 6
// DC (register select) ------- Attiny85 pin 7
// RST ------- Attiny85 pin 2
// CS (CE) ------- to GND
//LCD5110 myGLCD(0, 1, 2, 3, 6); //D6 don't exist - conect CS to GND
extern uint8_t BigNumbers[];
void setup(void) {
myGLCD.InitLCD();
myGLCD.clrScr();
}
void loop(void) {
myGLCD.setFont(BigNumbers);
byte i;
byte data[12];
int16_t raw;
float t;
TemperatureSensor.reset(); // reset one wire buss
TemperatureSensor.skip(); // select only device
TemperatureSensor.write(0x44); // start conversion
delay(1000); // wait for the conversion
TemperatureSensor.reset();
TemperatureSensor.skip();
TemperatureSensor.write(0xBE); // Read Scratchpad
for ( i = 0; i < 9; i++) { // 9 bytes
data[i] = TemperatureSensor.read();
}
raw = (data[1] << 8) | data[0];
t = (float)raw / 16.0;
myGLCD.printNumF(t, 1, CENTER, 14);
}
Step 4: Specifications:


Working voltage 3 - 3.3 V
Current 5mA
Step 5: Version With Batteries:


