The skilled and experienced developers of a reputed Website Designing Agency in Phoenix AZ have laid down steps to convert a website into an android application using Android Studio. They say that if you are seriously on the lookout for a way to convert a website into an Android mobile application, then you are certainly not alone in this search. With the increased availability of smartphones and internet connection, customers these days rely more on their smartphones for carrying out day-to-day shenanigans. This increased mobile dependence has geared small as well as large Multi-National Corporations (MNCs) into taking their business mobile. Those who are still not harboring the endless potential of the mobile, then they are definitely missing out on large business opportunities.
If you are still not convinced with our train of thought, then just consider this, almost two decades ago when websites were sneaking their way into the lives of small business owners, websites played a very important part in helping businesses garner huge traffic, increased sales and astonishing profits. Today, having a website is considered a key factor in a small business’ success today. So, what was once a trend has now become a full necessity. Don’t you think the same is applicable to mobile apps? We strongly believe it is.
The skilled website and mobile developers, as well as the seo experts of a high acclaimed agency in Seo Services in Phoenix Arizona to help businesses stake out their own spot in the mobile frontier, have put together steps to convert a website into an android application using Android Studio.
Just take in these steps, follow them step-by-step and you will be ready with a fully functional mobile application. There is an element which is used if you want to structure a web application (or just a web page) as a part of a client application, which is WebView. WebView is actually an extension of Android’s View that enables mobile developers to have the full view of the web pages as a part of their activity layout- XML(layout) file or Java class.
Step 1: The first and pretty obvious step is to take a responsive website that you want to convert into a mobile application. The thing you have to make sure is that the website you are choosing should be fully responsive (mobile friendly) website. Here we are for the sake of explaining the whole process to you taking a hypothetical example of our own website www.websolutioncentre.com to convert into an android application using WebView which is a Mobile responsive site.
Read Also: Explore the World of AR and VR with Google’s Open Library “Poly”
Step 2: Start with creating a new project in Android Studio and name it WebSolutionCentreWebViewApp.
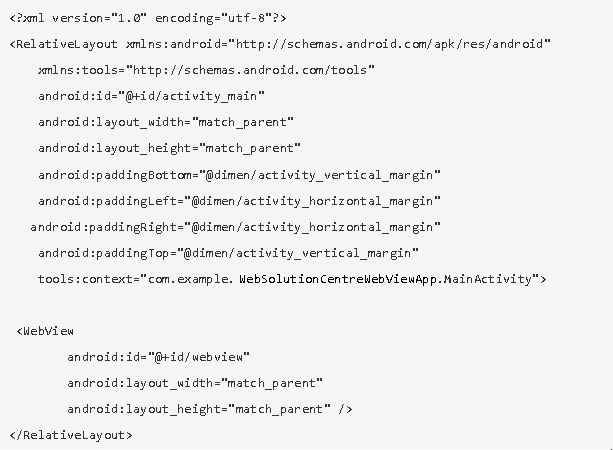
Step 3: Now open res →→→→→ layout →→→→→→ activity_main.xml (or) main.xml, create the interface of the application and then incorporate webview element to it.
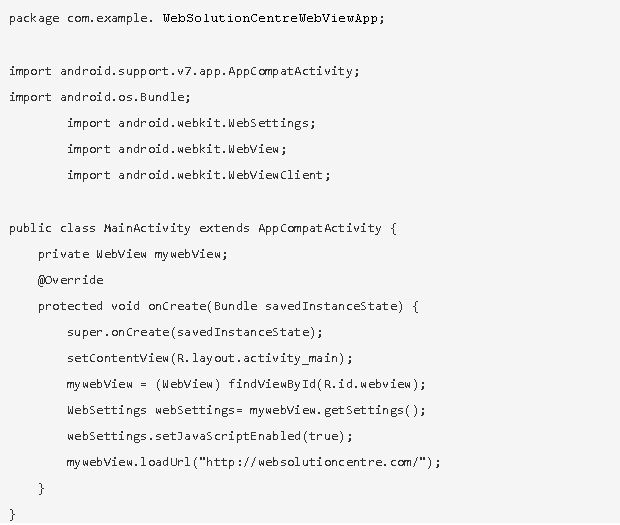
Step 4: Next, open the src →→→→→ package →→→→→ MainActivity.java. After this you need to first declare a webview variable, then enable the JavaScript and load the URL of the website you have chosen to convert into a mobile application.
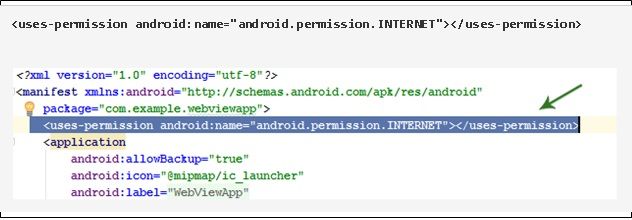
Step 5: Now you have to grant internet permission to the xml file. For this Open AndroidManifest.xml file and to it add internet permission just after the name of the package. This step is important to carry out as it will let the App load data directly from the website.
The code is this way:
Step 6: After adding the internet permission to the application, the application is complete. But you will witness one minor glitch that the application will open the links in the browser and not in the application itself. The way to rectify this problem is to add a line of code in your MainActivity.java class.
mywebView.setWebViewClient(new WebViewClient());
Step 7: Now your application needs some back buttons, for this, you have to add this line of code to your MainActivity.java class.
public void onBackPressed() {
if(mywebView.canGoBack())
{
mywebView.goBack();
}
else{
super.onBackPressed();
}
}
Here is the final activity_main.xml code
| <?xml version=”1.0″ encoding=”utf-8″?> <RelativeLayout xmlns:android=”http://schemas.android.com/apk/res/android” xmlns:tools=”http://schemas.android.com/tools” android:id=”@+id/activity_main” android:layout_width=”match_parent” android:layout_height=”match_parent” tools:context=”com.example. WebSolutionCentreWebViewApp.MainActivity”> // WebView Element |
Here is the final MainActivity.java complete code:
package com.example.webviewapp;
import android.support.v7.app.AppCompatActivity;
import android.os.Bundle;
import android.webkit.WebSettings;
import android.webkit.WebView;
import android.webkit.WebViewClient;
public class MainActivity extends AppCompatActivity {
private WebView mywebView;
@Override
protected void onCreate(Bundle savedInstanceState) {
super.onCreate(savedInstanceState);
setContentView(R.layout.activity_main);
mywebView = (WebView) findViewById(R.id.webview);
WebSettings webSettings= mywebView.getSettings();
webSettings.setJavaScriptEnabled(true);
mywebView.loadUrl(“http://abhiandroid.com/”);
// Line of Code for opening links in app
mywebView.setWebViewClient(new WebViewClient());
}
//Code For Back Button
@Override
public void onBackPressed() {
if(mywebView.canGoBack())
{
mywebView.goBack();
}
else
{
super.onBackPressed();
}
}
}
I hope this blog will be able to help you understand how you can easily convert your website into a mobile application using Android Studio. Do let us if you find this blog useful by simply leaving your comments in the comment box below.