How to repair/unbrick Samsung Galaxy J6 with stock firmware
With the J series, Samsung has us brought has many pocket-friendly smartphones. With decent hardware specs, people are more to purchase them. Launched this year, the Samsung Galaxy J6 is getting quite a fame around all corners. If something bad has happened with your or probably, you’ve bricked it, then this guide is for you. In this tutorial, we’ll help you to unbrick the Samsung Galaxy J6 using the stock firmware. We will restore this phone completely to its native operating system. That makes your phone function again like it was working before.
Just like the other smartphones, the Galaxy J6 can be bricked or become dead easily. This smartphone runs on the Android 8.0 Oreo operating system. That makes it possible to enjoy new features and functionalities. However, you might have tried to achieve even more custom operations. Most of the time, we brick our phone while performing the custom operations like rooting, installing a custom ROM, and something that is not normal. Also, there are chances that some applications (must see our list of best apps for Galaxy J6 that enhance the experience) break down your phone. I know how things become so frustrating when something happens to the phone.
Thus, by following this guide as exactly as we mention, you can recover your bricked phone. We will replace the entire operating system with the official stock firmware. That will remove all the affected part of the operating system. Until the problem is linked to the Android operating system, you can fix it using this guide. However, if anyhow you’ve bricked the hardware portion, you better seek service center help. In this tutorial, we’ll flash the stock firmware on Samsung Galaxy J6 to unbrick it and make it work again like before.
This method is officially accepted by the Samsung. Thus, it won’t affect the warranty of your phone. Or, you can use this tutorial to restore the lost warranty. Since it removes all the custom aspects, you can be sure that you get official support. That means if you’re using a custom ROM or recovery, you’ll lose them. There is one more important thing about this process that we should discuss. This process wipes the internal memory completely. All the stuff stored under the internal memory will be deleted. And we simply cannot revert this process. Therefore, we recommend you to backup all important stuff before you go further. Use our universal guide for Samsung phones; how to backup Samsung Galaxy phones.
There are more points to discuss. Read all the prerequisites that we mention below thoroughly and make sure to make preparations accordingly.
Prerequisites
- This tutorial is only for Samsung Galaxy J6 variants. And you shouldn’t deploy them on any other smartphones. That could create even more problems.
- Flashing the firmware on the phone will wipe your phone completely. Therefore, if you have a chance to back up, then create it is so. Once you perform this operation, you cannot go back.
- If you’re using a custom ROM or recovery, these are replaced with the stock aspects. Also, the root access will be removed as well.
- You required a Windows-based computer to complete this operation. And a USB cable of your phone.
- Enable the USB Debugging on your phone using →this tutorial. You require this option as we are about to establish a connection between the computer and your phone.
- Charge your phone to the good extent. It should be able to keep up while we complete this procedure.
Downloads
- First, you need to download the official stock firmware of your phone from →here.
- Use your Device Model number to find and download the firmware. To find it, tap on Settings->Software Information->About Phone->Device Model number.
- After you download the firmware, extract it on your computer to obtain the firmware file, that has .md5 extension.
- Now, download the Odin tool from →here.
- Extract the package to get an executable Odin program.
- Next, Download the Samsung USB Drivers from →here. Install them on your computer, so your phone can be detected by the computer.
Now, you’re ready to go further and flash the stock firmware on your phone.
How to flash stock firmware on Samsung Galaxy J6 and unbrick it
- First, turn off your phone using the power menu options.
- Now, boot your phone into the Download Mode — press and hold Volume Down and Power buttons together until the Samsung logo appears. Then, use the Volume Up button to get into Download Mode or follow on-screen instructions.
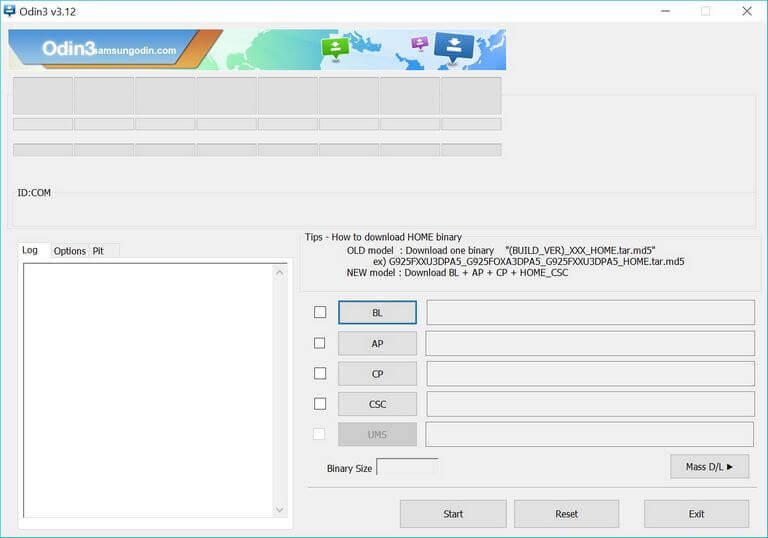
- Now, run the Odin program. This tool looks like this:

- Now, connect your phone computer through a USB cable.
- The Odin tool will detect your phone. If nothing happens, then try to re-install the USB Drivers, restart your computer and try again.
- Tap on ‘AP’ button and load the downloaded firmware file.
- Then, tap on ‘Start’ button to start the flashing process. Make that you don’t make any other changes.
- Once it is completed, take off your phone.
Now, your phone will reboot for the first time. To boot up, it may take several minutes and that happens most of the time.
That’s it, you’ve successfully unbricked your Samsung Galaxy J6 using the stock firmware. Now, everything should work fine on your phone. All bugs should have vanished. That’s how you can easily repair/revive your phone from the bricked condition. So, it ends our tutorial here and we hope that our readers would find it helpful.
If stuck anywhere or any problem, just drop your comments below. We’ll help you with a possible solution at the earliest. Stay connected with us for useful tutorials and list.