Home        T-Shirt DIY's     Re-Styles      WobiSobi DIY's        Videos 

Monday, September 5, 2011

Project Re-Style #34 Frame Earring Holder

Well, I finally did it. I made a much needed frame earring holder.
Welcome to Project re-Style #34.
I suppose Re-Styling does not just involve clothes and accessories, furniture can also be Re-styled.  I have needed one of these for so very long and when my Good friend Leah, shared with me her earring holder, HERE, I knew this was going to be something that I had to have.  It just so happens that on my last trip to Georgia,  my wonderful sister in law gave me two beautiful wood frames.
So the much needed frame earring holder was born..

   Tutorial
Things you need
1.Old frame
2. Screen
3.Staple gun
4.Wood dowel or and old beautiful branch
5 Drill( If you want to add the necklace holder)
6. Screw
7. Scissors


 First staple your screen to the back of your frame. You could paint this first, but I loved the color of mine. Then trim the excess screen with scissors .
 I took my wooden dowel and found the middle,  then I drilled a hole through it. I also found the middle of the frame and drilled a hole through that.
Then I screwed the screw through the dowel,then through the frame just enough to make it  sturdy.
you should have space like the picture below 

then I screwed the screw through the dowel,then through the frame just enough to make it  sturdy.
you should have space like the picture below  
and that is all there is to it. 
This project took me only about an hour.(painting the frame will take just a little longer).
I am so excited to  have a place for all my new creations.

34 down 18 to go.
Click on the picture
for all the details about 
Project Re-Style.
And I hope you all had a wonderful day off
<3
Anne
Linking to
Take a Look Tuesday

Labor Day


Purse I made, HERE
Pin, HERE
I am Soooooo thankful for Labor Day.  
Loving every minute that I am able to spend with my family..
<3
Anne

Sunday, September 4, 2011

Fringe Purse DIY

Fringe is something that fascinates me, maybe it is the movement that it make's. When I hold something that has fringe on it, it feels like the piece is  alive. Tassels, I think,  fall into the category of fringe, but  just on  on a slightly smaller scale.  And if you follow me, you  know how much I love Tassels.
I made this clutch after I came across a beautiful Tory Burch clutch on the internet.
Can I DIY this? I Yes I can.


Inspiration
This one cost about $350.00

Tutorial
Things you Need..


1. Leather about 2 pieces, 8inches  by 11inches( one for the clutch base and one for the fringe)
a.front fringe 6 inches by 6 inches
b. 3 strips of 2 inch by 6 inch fringe
c.One more strip 4 inches by 9 inches
d. 2 strips of leather 3/4 of an inch by  11 inches

2.Waxed thread.
3. Leather Needle
4.E6000 glue
5.Leather hole punch
6. Nail
7 Magnetic snaps

 1.Cut your leather pieces.

 A.Main Fringe
B. Front fringe
C. Pocket Fringe
D. Strips, to cover pocket.
 Sew the base clutch,  turn it inside out.


         Glue each fringe (piece A)
 Glue pocket (Piece C)
 Glue on  cover strip D, (this is a finishing piece)
 Punch your Holes
and then sew and x with your wax thread.
This will anchor your 3 pieces.

Add Magnetic snaps
Instructions Here

Glue your decorative fringe (Piece B)
This will cover your magnetic snap.


 and with that you are all done!!
Any questions,?
Please Email me
Wobisobi@gmail.com
I hope you have a Super Fantastic Sunday.

<3

Friday, September 2, 2011

Under the Bur Oak Tree


at night


Happy Friday to all of you.!! 
I hope ( if you live in the States) that you are all geared up for your long weekend..
I am in the process of putting together a tutorial that might take me  a little longer than I had planned.  In the mean time, I wanted to share with you a new addition to our Dinning room.  We have this beautiful Bur Oak tree outside and I decided to cut off one of the limbs and use it as decor in my dinning room .My son was nice enough to have pity on me and help me install it, which only  took us about 1 and 1/2 hours.  I just wrapped it in white lights and Whammm!!! instant  atmosphere. I love eating here at night with just the lights of the tree on.  It is the perfect dinner spot. 
Have any of you ever decorated with outside beauty?
Have a Wonderful, Long Weekend.
<3
Anne

Thursday, September 1, 2011

And The Winner is.........


 First of all, I want to thank you all for being so very patience.  Events have happened in our Family that are just to wonderful for words, thus explaining my absence from blogging.  

Thank you all so much for your support,and love..

I had my H pick the name, out of the 58 who entered. WOW 58!!!
Is the suspense killing you? It was killing me!! so without further adieu. 

I placed all the entry's in this basket..

 and had H pick one!!!


The winner is....


Sami, from the blog ~ Where the creek meets the lake~ Congratulations..  YAY!!!!!!!
Please email me your address and I will send you your bracelets.
Have a wonderful Night Everyone!!
<3
Anne


Wednesday, August 31, 2011

Please Forgive.


 Because of a few circumstances beyond my control, the winner of the bracelets will be announced tomorrow. 
Please forgive.
<3
Anne

Glimmer and Sparkle


What is  the fascination women have with things that sparkle and shine. Whenever I am out shopping I am always attracted to sparkly things, earring, necklaces, big shiny~ twinkly rings. Whenever I see sparkle or shiny things, I can not help myself, I have to go to it, hold it in my hand, admire it, force myself to put it back where it came from. ( Sigh
It is almost like I am locked in a tractor beam and I am being pulled to it.  
Do all women experience this same feeling?
  They have to, or jewelry  would not be so popular.
I just know it has to be something physiological.


This is a piece that I did with some left over wood beads.
Of  course I had to put a little sparkle on them because.... 
well,~ let's just say had to!.

Tutorial
Things you need
1. Wooden beads
2. Glitter
3.Mod podge
4. Small brush
5.Jute
6.Chain
7. 2 jump rings
8. 1 lobster claw clasp
9. 2 necklace clasps( for the jute)
10. Pliers 


1. Paint your wooden beads with Mod Podge, then sprinkle with glitter. let dry and do a second coat, let that dry and put on a final coat of Mod Podge this seals the glitter.( let that dry)
2. take your jute and cut it the length you want, and start adding the beads.  I  always start with the middle and work my way alternating from side to side, tying a knot in between each bead. Add your necklace clasp to each end of your jute using your pliers.
3.then take your chain and cut it into 3 lengths.  I placed mine down on the table to decide how long I want each chain. Don't forget about your string of glitter beads, include them when cutting the length your chain. .
(You  will have 4 tiers  when you are done.)
4. for the side chain and beads that are just hanging, follow the same instructions. Just make them both  long enough to go down one side of the necklace.
5 Attach  one side of the chain and the jute to a jump ring, do the same to the other side, also while you have your jump ring open add your  lobster claw.


and with that, you are all finished.

Wear this  to dress up a plain Tee.
Have a wonderful Wednesday!
Oh yeah, don't forget the winner of my bracelet giveaway will be announced tonight.  
I will see you then...
 The suspense is killing me...... too exciting..
<3
Anne

Monday, August 29, 2011

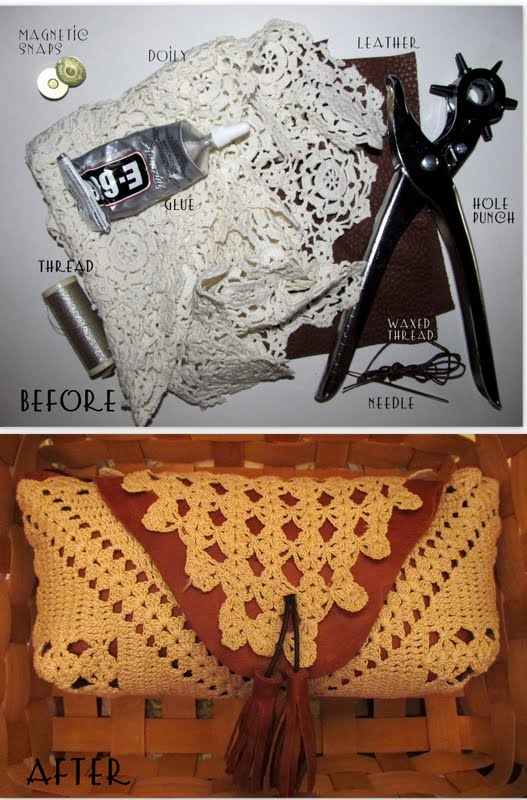
Project Re-Style #33 Antique Doily turned into a Small clutch.

Happy Monday as always Everyone!!
Welcome to Project Re-Style Monday, # 33.  
This weeks Re-Style project is something that came to me in a dream. I woke up one day last week and had a vision of  a small clutch  that looked like a antique doily.  So What did I do?  I made one with an antique doily, and some leather of course.


Tutorial
Things You Need
1. Doily
2. Leather~ the same size as the doily you are using, and a little extra for embellishments.
3. Leather hole punch
4.Thread
5.Magnetic snaps
6.Needles (one big and one small one)
7.Waxed thread
8.Glue E6000
9.Scissors (Not Shown.)
10.Sewing Machine


1. Cut out your leather to match the shape of your doily.
2.Make sure the doily fits just a tad bigger then your leather.


3. fold your leather in half, put a small amount of glue on your leather
4. punch holes down both sides
5.with needle and waxed thread stitch the sides together.
6.  take the  inside, bottom corners, and stitch them straight across
7. then turn right side out.
8. fold in one flap to the inside of the purse, I glued this piece down.


9 Now sew the doily with a smaller needle and some matching thread, just like the leather. You are going to set the leather purse into the doily sleeve.
10.  With my sewing machine, I stitched the doily to the leather.


11. Add your magnetic snaps. instructions for that HERE
12. I added an extra piece of leather to the inside flap, to hide the snap and for extra support. 
13. I made some tassels( instruction HERE for those),  I punched a hole and added them to the front of the clutch.

~and that is it~ 
all done.

A little leather, a little lace.

I hope you all have a wonderful Monday.
I am praying for those who are dealing with Irene, and the after math.


33 down 19 to go
 Click on the picture 
to get all the details on Project Re-Style.
Please Email me with any questions
Wobisobi@gmail.com

<3
Anne
AND
 don't forget to sign up for my Bracelet giveaway.
10 of these can be yours.