Thanksgiving Dinner Kidlet-Style
Ok, the felt pile is going down. Down, down...down! Yippee! I have been knee deep in lots of felt-y fun these last few days but all for a good cause. As of right now, I have 8 days remaining to get Noah's birthdays gifts finished and I am actually doing pretty good, knock on wood...or a pile of felt :) I thought I'd share with you one of the gifts that I just finished and am so lovin' on right now...A felt turkey dinner...just in time for the holidays.

Those little drummies are detachable too...so they can really dig into this meal!
So, what do you think? I'm a-thinking it's going to be so much fun for Noah (and Penny) to play with while I roast my big bird up on T-day. I'm just really glad that his birthday is a week before Thanksgiving cause now they can both get some use out of it as a Thanksgiving dinner and a Christmas dinner too...WooHoo for multiple uses!
 You are going to cut two of these turkey bodies (above) out of two sheet of your tan felt. It kinda looks like a turtle shell, doesn't it? You may need to adjust the measurement depending on how big your felt sheets are, I noticed they vary in size depending on the store...weird. Oh, and you want to make the best use of your felt because you will be using the tan felt scraps to make the drumsticks!!! (Just a little FYI...otherwise you may need to buy a 4th sheet of the tan felt!)
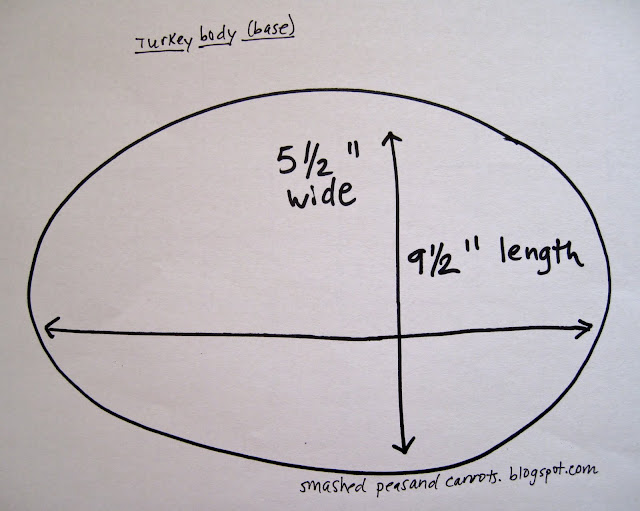 Then, you are going to cut one of these (above) turkey bases out of the remaining third tan felt sheet.
 Next, using the tan felt scraps, cut 4 turkey drumstick bodies (the circle above), set aside. Now it's time for that cream felt sheet, you excited yet? Alright, go ahead and cut 4 of the turkey drumstick bones from it and set aside. An FYI, you may want to just fold over your felt so you only have to make two cuts of each.


Well, are you up for it? Are you interested in making one too? It is really super easy...here's what you need:
Thanksgiving Turkey
3 sheets of tan felt
1 sheet of cream felt
matching thread (cream and tan)
polyfil stuffing
2 inches of velcro, cut into two 1 inch pieces
Ok, so you got the goods? Then let's begin now shall we?
First, you are going to free-hand yourself a turkey body and drumsticks. Here are what mine looked like (the following three pictures):
 You are going to cut two of these turkey bodies (above) out of two sheet of your tan felt. It kinda looks like a turtle shell, doesn't it? You may need to adjust the measurement depending on how big your felt sheets are, I noticed they vary in size depending on the store...weird. Oh, and you want to make the best use of your felt because you will be using the tan felt scraps to make the drumsticks!!! (Just a little FYI...otherwise you may need to buy a 4th sheet of the tan felt!)
 Then, you are going to cut one of these (above) turkey bases out of the remaining third tan felt sheet.
 Next, using the tan felt scraps, cut 4 turkey drumstick bodies (the circle above), set aside. Now it's time for that cream felt sheet, you excited yet? Alright, go ahead and cut 4 of the turkey drumstick bones from it and set aside. An FYI, you may want to just fold over your felt so you only have to make two cuts of each.
Now for the sewing fun!
Take the two turkey body sides you cut out and sew a piece of velcro to each felt piece keeping the velcro towards the back end or wider region, just like real turkey legs would be located. I sewed the rough velcro part to the turkey body and the softer velcro part to the drumstick cause I figure the kidlets will be pretend eating them and didn't want it to scratch their cute little smoochable faces! :)
Then, match up the two turkey body sides (with velcro on the inside!) and stitch all the way around the curved part. This will end up being the top of the turkey. Then match up the oval turkey body base and sew this to the remaining free edges...making sure to leave an opening to turn and stuff it. Now, just so you know, I had to do some trimming of my oval to make it fit better...it happens to the best of us, right!?! Then just flip it right side out, stuff, and sew the opening closed. Yay!! Halfway there!
Now onto the drummies...almost done, promise!!!!
Ok, so take a tan felt circle and sew the smooth side of the velcro to it, do this to one other as well. Then, match up a velcroed (is this even a word?) tan felt circle (with velcro on the inside) to a non-velcroed one and sew all the way around leaving an inch opening for turning and stuffing. Flip it inside out and stuff it but not too full! Then, grab a pair of the cream bones and sew all the way around...leaving no opening. Push the bone into the opening of the drumstick and sew the opening closed.
See, what did I say, that was fast, right? Now, sit back and admire that bad boy. Don't you wish a real turkey took this much time to make? That would really be sweet!
Oh, and sorry for the lack of pictures to this post, I just wasn't thinking! As always, if I didn't explain something clearly just leave a comment or shoot me an email.

Drumsticks all separated and ready for the eatin'

Mmmm...looks good enough to eat!
Now, let's all give thanks for a Thanksgiving Meal that doesn't mess up the kitchen
Are you with me on this one!?!
Labels: Felt, Sewing, Thanksgiving, Tutorials
posted by Maggie @ 11/12/2009
![]()
![]()


18 Comments:
LOVE IT! Bring on the felt! I am featuring this one on somedaycrafts so everyone can make one for the kiddos!!!
This is just so darn cute!! You did an AWESOME job!!
That is so cute. Great job. I'm having a giveaway this week if you's like to stop by.
Too much fun!!
super cute!! i need to try making felt food!
So cute! I love felt food!
That is just too darn cute! Your new site is great!!
LOVE IT!
Love it!! I'm posting a link on my "to do" list. Polly @ http://helpinglittlehands.blogspot.com/
Oh my goodness! I have to say this is the cutest thing I have ever seen!!! I am going today to buy the supplies. Thanks for sharing and posting directions:o)
This is a great tutorial. I've been looking for more Thanksgiving crafts and this is perfect. Thank you!
This is the cutest thing ever! Yet another great tutorial, and something else to add to my growing list of projects to tackle! Thank you for posting this!
awesome tutorial...adorable and very fun to make!!!..and so easy too!! thanks!!! :)
I totally tried this and it worked. Of course I got all sew intoxicated and turned everything despite your wonderful instructions.
Check out mine at
www.craftmesillylibrarian.blogspot.com
Is it just me? I didn't see the instructions for the carrots or the green beans.....
When I saw this in my I Sew Free email, I laughed out loud. This is hilarious!
This is so cute. I have some tan Flannel and some Orange and Green felt, now I just need some cream felt. Bonus for me I have all the colors. I may just have to make this. You could always use some stuffing to make mashed potatoes as well :-)
SOOO CUTE!
Post a Comment
Thanks so much for leaving a comment, it really makes my day! I read each and every one so please leave your email or make sure your profile is linked to your email so that I have a way to reply back to you! Thanks again and you're awesome!
Subscribe to Post Comments [Atom]
<< Home