How to Make a Fabric Memory Board to Display Your Digital Photos - An Easy & Cheap DIY Craft Project!
What You’ll Need
- 1 yard of quilt batting (low density is fine)
- 1 yard of fabric of your choice (pick something that really reflects you, this is the soul of the memory board)
- 1 large cork board with wood border
- Staple gun
- Scissors
- Shiny ribbon of any length; non-wired is best. Ideally it should coordinate with the fabric.
- Favorite photos!
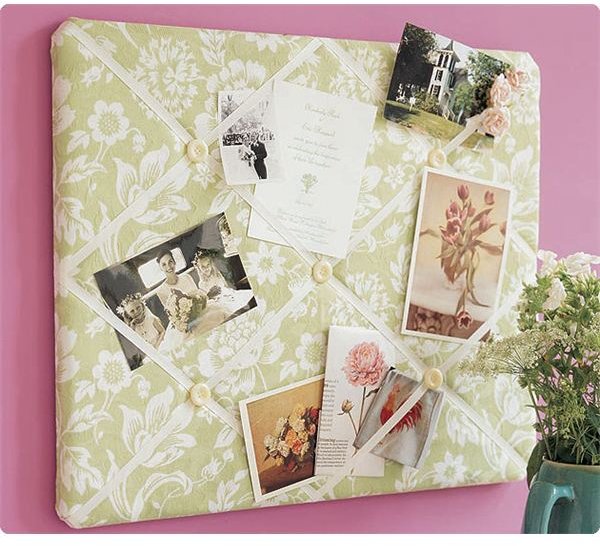
Example (Click to enlarge)
How to Make a Memory Board
1. Lay the quilt batting over the cork board. Cut it down to fit just to the edge of the cork board.
2. Lay the fabric smoothly over the quilt batting, making sure the patterned side is facing out (not touching the batting).
3. Flip the board over so the fabric is lying flat on the table.
4. Pick up the fabric and fold it over the left hand border of the cork board ONLY. Make sure it is even.
5. Staple the fabric to the wood border of the cork board in an even line with the staple gun. Space the staples two to three inches apart.
6. Go to the right hand border of the cork board and fold the fabric over it. This time, pull the fabric taut so it’s stretched over the board, but not so hard it rips against the staples on the other side.
7. Staple it down in a flat, even row, stretching the fabric taut as you staple, making sure the staples are going into the wood border.
8. Repeat steps 4-7 for the top and bottom borders.
9. Flip the board over and make sure that the fabric is smooth over the board. It should be pressing the batting down slightly so that you have a puffy, smooth surface.
10. Trim the excess fabric from the back.
11. Cut several lengths of ribbon that are several inches longer than the width of the board.
12. Starting with the upper left corner, staple the ribbon to the back and draw it diagonally across the board, stapling it in the middle of the bottom. It should be quite taut against the fabric. (If too loose, the pictures will fall out!)
13. Keeping the ribbon evenly spaced, do this across the board. When you reach the end, switch directions so the ribbon forms perfect diamonds over the fabric.
14. Trim the ends of the ribbons.
15. Weave your pictures through the ribbons. They should stay put with just the tension from the ribbon.
This is a beautiful, professional craft that yields a long lasting result. You can purchase denser quilt batting for a more puffed board if so desired. It’s a truly special way to display your photographs!
Variations
This version does NOT have buttons; the tension of the ribbons and the overlapping weave is enough to hold your items in place, but many people prefer the look of buttons. If you’re one of these people, try these options:
- You can glue fabric covered buttons to the ribbons with hot glue for an easy finish.
- If you would prefer to sew buttons on for more security, before stapling the fabric to the cork board, lay it flat. Lay your ribbons on the fabric in whatever design you prefer, and pin them into place. You can then take the buttons at the intersections and sew them on BEFORE attaching the fabric to the board.
References
Photo credit: https://www.pulpproducts.com/custom_images/memory_board.jpg
This post is part of the series: 10 Fun Photo Craft Projects!
This article series will provide you with 10 fun and inexpensive photo craft projects. With easy-to-follow instructions and helpful tips, your digital photographs will finally get the attention they deserve. These photo craft projects are great for the whole family…even teenagers!
- 10 Fun Photo Crafts - Get the Most From Your Digital Photos!
- Learn How to Make Personalized Photo Bookplates - A Fun Photo Craft Project!
- Create Your Own Photo Stickers with this Fun Photo Craft!
- Learn How to Make a Photo Family Tree - An Inexpensive & Fun Craft Project
- Wall of Photos - Perfect Photo Craft Project for Teenagers
- How to Make a Photo Tote Bag - Save Money by Doing it Yourself!
- How to Make Photo Frames from CD Cases
- How to Make a Memory Board to Display Photos
- How to Make a Photo Bouquet - A Great Craft Project that Shows Off Your Photos!
- How to Make a Photo Coloring Book
- How to Make a Corkboard Photo Frame!